
Soft Paint Bubbles on Your Wall? What They Mean and How to Fix the Problem
Why Bubbling Paint Shouldn’t Be Ignored
Noticing soft bubbles forming under the paint on your wall can be concerning, especially if they seem to expand over time.
Although it may be easy to assume humidity is the only cause, bubbling paint can signal deeper issues that require attention.
Understanding what causes paint to blister is important not only for appearance but also for protecting the structural integrity of your home.
In many cases, these bubbles are a warning sign that moisture is trapped beneath the paint surface.
Identifying the root cause early can prevent more extensive and costly repairs later.
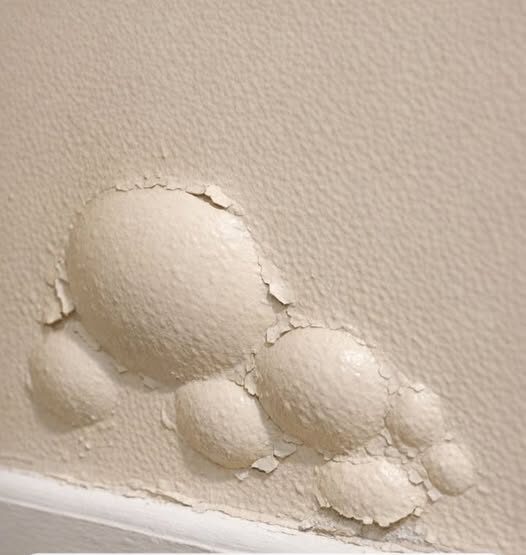
What Paint Bubbles Actually Are
Paint bubbles, often called blisters, occur when the paint film lifts away from the surface beneath it.
This separation typically happens because the paint loses adhesion to the wall.
The space inside the bubble may contain moisture or air, which is why it often feels soft when pressed.
Moisture trapped under the paint creates pressure as temperatures change, forcing the paint layer outward.
High humidity levels and poor ventilation can worsen the problem, particularly in enclosed spaces.
These bubbles can vary in size, ranging from tiny spots just a fraction of an inch wide to larger patches spanning several inches.
Humidity or Something More Serious?
The first step in diagnosing bubbling paint is evaluating the environment.
Humidity levels above 60 percent can contribute to excess moisture in the air, which may lead to blistering.
Using a hygrometer to measure indoor humidity can provide helpful insight.
If bubbling appears in bathrooms, kitchens, or laundry rooms, high humidity may be the primary factor.
However, widespread bubbling or blistering on interior walls far from water sources could indicate a more serious issue.
In those cases, hidden leaks or rising damp may be responsible.
Hidden Moisture Sources Behind the Wall
Several concealed sources of moisture can lead to bubbling paint.
Plumbing leaks inside walls are a common cause, especially in areas with pipes running behind drywall.
Roof leaks can also allow water to travel downward through walls, eventually becoming trapped beneath the paint surface.
Poor insulation may cause condensation, particularly in colder weather when warm indoor air meets cooler wall surfaces.
In older homes, water may rise from the ground through capillary action, drawing moisture upward through foundations and into walls.
Finding the true source of moisture is essential before attempting cosmetic repairs.
Warning Signs of a Hidden Leak
Paint bubbles combined with discoloration can strongly suggest moisture intrusion.
Mold growth or a persistent musty smell may also indicate water trapped inside the wall cavity.
Peeling paint, crumbling drywall, or areas that remain damp even during dry weather are additional warning signs.
If these symptoms are present, the problem is likely more than surface humidity.
An infrared camera can help detect cooler areas behind walls, which often point to hidden moisture.
This method allows inspection without tearing into the wall unnecessarily.
Understanding Rising Damp
Rising damp occurs when moisture from the ground moves upward through walls.
This process is more common in older buildings that lack a proper damp-proof barrier.
Signs of rising damp often appear near the lower portion of walls.
You may notice a tide mark, powdery salt deposits, or a consistent musty odor.
Using a moisture meter at different heights along the wall can help confirm this issue.
Higher moisture readings closer to the floor are typical indicators of rising damp.
Other Causes That Lead to Bubbling Paint
Moisture is not the only factor behind paint blisters.
Poor surface preparation before painting can prevent proper adhesion.
Painting over a dirty or damp surface can trap moisture underneath.
Applying paint in unsuitable conditions, such as extreme heat or humidity, can also create problems.
Old or low-quality paint may fail to bond properly with the surface.
Additionally, vapor barriers installed on the warm side of insulation can trap moisture, leading to condensation and bubbling.
Simple Tests to Identify Moisture
You can perform a basic moisture test using aluminum foil.
Tape a piece of foil over the affected area and leave it in place for 24 hours.
If condensation forms on the wall side of the foil, moisture is likely coming from within the wall.
If moisture forms on the outer side, humidity in the room may be the issue.
Inspecting nearby plumbing fixtures for leaks and checking the roof and gutters for damage can also help narrow down the source.
A moisture meter provides more precise readings and can confirm whether the wall contains excess moisture.
Immediate Steps to Limit Damage
Acting quickly can prevent the problem from worsening.
Reducing indoor humidity through better ventilation or a dehumidifier can ease pressure on the paint surface.
If a leak is suspected, turning off the water supply to the affected area is a practical first step.
Removing the bubbled paint allows trapped moisture to escape and helps the wall dry more effectively.
This temporary measure can reduce the risk of mold growth while you address the root cause.
Permanent repairs should always focus on eliminating the source of moisture.
How Professionals Diagnose the Issue
Professionals rely on specialized tools to detect hidden moisture problems.
Thermal imaging cameras highlight temperature differences that may indicate water intrusion.
Moisture meters provide detailed measurements of moisture content in walls and floors.
In some situations, a small section of drywall may be removed for a visual inspection.
Pressure testing can also determine whether plumbing systems are contributing to the issue.
Accurate diagnosis ensures repairs target the real cause rather than just the visible symptoms.
Repair Options Based on the Cause
If bubbling is caused by humidity alone, improving ventilation and repainting may resolve the issue.
The affected area should be scraped, sanded, and allowed to dry completely.
Applying a primer before repainting helps ensure proper adhesion.
For leaks or rising damp, more extensive repairs may be required.
Fixing plumbing issues, repairing roof damage, or installing a damp-proof barrier can address deeper problems.
In severe cases, sections of wall may need to be opened to repair structural damage and replace insulation.
Preventing Future Paint Bubbles
Prevention begins with controlling moisture levels inside your home.
Bathrooms and kitchens should have adequate ventilation, including exhaust fans if possible.
Opening windows regularly can improve airflow and reduce trapped humidity.
Maintaining gutters, downspouts, and exterior seals helps prevent water from entering walls.
Applying waterproof coatings to exterior surfaces can add another layer of protection.
Routine inspections and maintenance remain the most effective strategy for keeping walls smooth and free from bubbling paint.
By addressing moisture promptly and ensuring proper preparation before painting, you can preserve both the appearance and durability of your walls.