
Low-Carb 3-Ingredient Ham Bombs Make a Fast, Cheesy Snack for Busy Days
A Simple Recipe Built for Speed and Comfort
Low-Carb 3-Ingredient Ham Bombs are the kind of quick, no-fuss food that fits easily into a packed schedule. With only deli ham, shredded cheddar, and cream cheese, they offer a warm and filling option that comes together without a long prep process.
The recipe is centered on convenience, but it still delivers the familiar comfort of melted cheese and savory ham fresh from the oven. Everything is rolled by hand, placed into a glass baking dish, and baked until the tops are bubbling and the edges take on a light golden color.
Because the ingredient list is so short, the method stays straightforward from start to finish. There is no complicated mixing, no lengthy cooking time, and no need to use several pans or extra equipment.
That simplicity makes these ham bombs especially useful for days when there is little time to cook but a hot snack still sounds appealing. They can fit into a late-night craving, an easy lunch, or a quick bite between activities.
Why This Recipe Works So Well
Each ingredient serves a clear purpose in the final dish. The deli ham creates the outer layer, the cream cheese brings softness and helps hold the filling together, and the cheddar adds a richer, sharper cheese flavor that melts beautifully during baking.
When combined, the cream cheese and cheddar create a thick filling that spreads easily down the center of each ham slice. Once rolled and baked, that mixture softens further and turns into a hot, creamy center.
The ham itself changes texture in the oven. As the rolls bake, the edges begin to brown slightly and the outside firms up just enough to make each piece easy to pick up and serve.
The cheddar sprinkled over the top finishes the dish with extra melted cheese. Some of it falls between the rolls and bubbles in the baking dish, creating the rich, hot finish that makes the recipe feel satisfying despite the short ingredient list.
An Everyday Option for Different Schedules
One of the strongest parts of this recipe is how easily it fits into different routines. It works as a quick snack, but it can also fill the role of a light lunch or a simple dinner when paired with a few easy sides.
These ham bombs are especially practical for people who want something warm without spending much time cooking. The ingredients are easy to handle, the assembly is direct, and the total baking time stays relatively short.
They also suit situations where a filling snack is needed without much cleanup afterward. Since the rolls bake together in one dish, the process stays compact and easy to manage.
The finished ham bombs are best served warm, straight from the baking dish after a short resting time. That brief pause allows the melted cheese to settle slightly, making the rolls easier to handle while still keeping the center soft and hot.
Ingredients for Four Servings
This recipe makes four servings and uses only three main ingredients. It calls for 12 slices of deli ham, thin to medium in thickness, with a total weight of about 3/4 pound.
It also uses 1 cup of shredded cheddar cheese, which is about 4 ounces. Half of that cheddar is mixed into the cream cheese filling, while the other half is scattered over the top before baking.
The final ingredient is 4 ounces of softened cream cheese. Softening it in advance makes it much easier to stir together with the cheddar until the mixture becomes smooth and spreadable.
Although the ingredient list is minimal, the combination creates enough flavor and texture to make the recipe feel complete on its own. The result is a dish that is simple in composition but still rich and satisfying once baked.
Preparing the Baking Dish and Filling
The oven should be preheated to 375°F, or 190°C, before assembling the rolls. A glass baking dish measuring about 8×8 inches, or a similar size, should be lightly greased to prevent sticking during baking.
In a medium bowl, the softened cream cheese is stirred together with 1/2 cup of the shredded cheddar. The goal is a filling that is well mixed and thick, but still easy enough to spread over each slice of ham.
This filling becomes the center of every roll. Since it is rich and creamy even before baking, it helps ensure that the finished ham bombs stay moist rather than dry.
Once the filling is ready, the ham slices can be arranged flat on a clean work surface. If any slices are particularly large, they can be cut in half to create smaller portions that are easier to serve as bite-sized pieces.
Rolling and Arranging the Ham Bombs
To assemble the rolls, a spoonful of the cheese mixture is spread down the center of each ham slice. A little space should be left near the edges so the filling does not all push out when the slice is rolled.
Each ham slice is then rolled tightly from one short end to the other, creating a compact log. The seam should be tucked underneath so the rolls stay in place while they bake.
After rolling, the ham bombs are arranged seam-side down in the greased baking dish. Placing them close together helps them support one another and hold their shape in the oven.
The remaining 1/2 cup of cheddar is then sprinkled across the tops. Some cheese may slip into the spaces between the rolls, but that only adds to the final bubbling, melted texture in the dish.
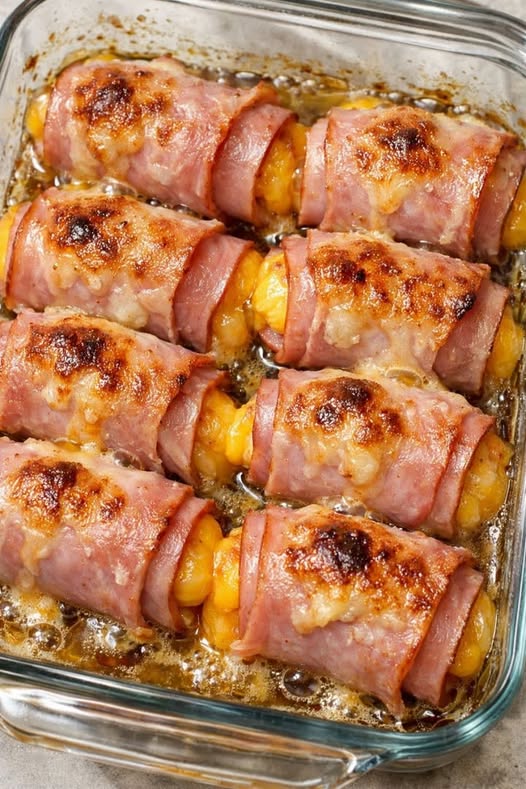
Baking Until Hot, Bubbly, and Lightly Browned
The baking time ranges from 15 to 20 minutes. During that time, the cheddar on top melts fully, the cream cheese center heats through, and the edges of the ham begin to brown lightly.
By the end of the baking time, a bit of grease may be visible sizzling in the bottom of the dish. That is one of the signs that the ham bombs are hot and ready to come out of the oven.
The visual contrast is part of what makes the finished dish so appealing. The browned ham edges, the melted cheddar across the top, and the bubbling cheese around the sides all signal that the rolls have reached the right texture.
Before serving, the ham bombs should rest in the baking dish for 3 to 5 minutes. This short wait helps the cheese set slightly, making the rolls easier to lift and eat while they are still warm.
How to Serve Them
These ham bombs can be served on their own, but they also pair well with lighter sides that balance the richness of the cheese. A simple green salad works well and keeps the meal feeling fresh.
Sliced cucumbers or cherry tomatoes also make easy side options. Their crisp texture and lighter flavor contrast nicely with the warm, cheesy rolls.
For those who want extra dipping flavor at the table, ranch or spicy mustard can be served on the side. That adds another layer of flavor without changing the main three-ingredient base of the recipe itself.
For a more filling plate, the ham bombs can be served with a cup of tomato soup or a quick sauté of frozen vegetables. Those pairings make the recipe feel more like a complete meal while still staying easy to prepare.
Flavor Variations and Small Adjustments
The recipe can be adjusted slightly without changing its basic character. For a milder flavor, mild cheddar or a Colby Jack blend can be used instead of sharper cheddar.
Making the rolls a little smaller can also help when serving picky eaters or younger diners. Smaller pieces can feel more approachable and work well as snack-sized bites.
For more heat, the cream cheese mixture can be seasoned with a pinch of garlic powder, black pepper, or crushed red pepper flakes before it is spread onto the ham. Pepper jack can also be used in place of cheddar for a spicier result.
A smokier flavor can be created by choosing smoked ham or smoked cheddar. These changes stay close to the original concept while giving the recipe a slightly different finish.
Useful for Parties, Snacks, and Meal Prep
These ham bombs can easily be adapted for serving to a group. One simple way to stretch the recipe is to cut each baked roll in half and serve the pieces with toothpicks as party bites.
That makes the recipe practical not only for home snacking, but also for gatherings where a warm finger food is needed. The compact size and cheesy filling make them easy to serve without much extra preparation.
The recipe is also well suited to meal prep. After baking, the ham bombs can be cooled and stored in the refrigerator for up to 3 days.
When ready to eat again, they can be reheated in the oven or an air fryer until the cheese becomes melty once more. That gives them lasting value beyond the day they are made.
Another time-saving option is to assemble the rolls in advance and keep the covered baking dish in the refrigerator. When it is time to eat, the dish can go straight into the oven, making it easy to serve something hot with minimal effort.
A Minimal Recipe With Lasting Appeal
Low-Carb 3-Ingredient Ham Bombs stand out because they do not require much to deliver a satisfying result. The ingredient list is short, the process is direct, and the final dish offers warmth, richness, and convenience in equal measure.
They work well for quick lunches, casual dinners, late-night snacks, and prepared-ahead meals during a busy week. Their flexibility is part of what makes them such a reliable option.
Fresh from the oven, they offer bubbling cheddar, creamy filling, and lightly browned ham in every bite. With just a few ingredients and a short bake, they turn into a comforting dish that feels far more substantial than the effort required.
For anyone looking for a fast, filling, and easy low-carb snack, this recipe provides a simple answer. It keeps the preparation uncomplicated while still producing something warm, flavorful, and ready to serve in minutes.