
Why Hard-Boiled Egg Yolks Sometimes Turn Green and How to Prevent It
The Green Ring Around Egg Yolks Is Harmless
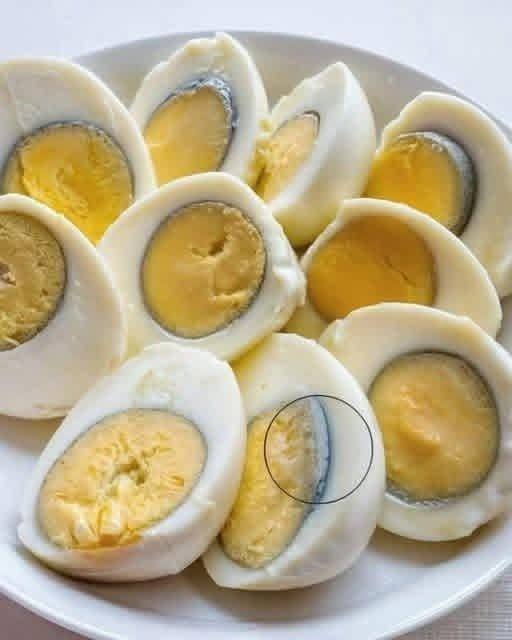
A greenish-gray ring around the yolk of a hard-boiled egg can make an otherwise well-cooked egg look less appealing. Many people notice it only after peeling the egg and cutting it open, especially when preparing eggs for salads, snacks, or breakfast plates.
Although the color may seem unusual, it does not mean the egg has spoiled. The ring is harmless and is caused by a natural reaction that can happen during the cooking process.
This common change in color is not a sign of bad eggs or poor kitchen hygiene. It is usually connected to timing, temperature, and how quickly the eggs are cooled after cooking.
What Causes the Greenish-Gray Color
The green ring forms because of a simple chemical reaction inside the egg. When an egg is cooked for too long, iron from the yolk can combine with sulfur from the white.
This reaction creates iron sulfide on the surface of the yolk. The result is the greenish-gray layer that appears between the yellow center and the surrounding egg white.
The effect is most noticeable in hard-boiled eggs because the yolk and white remain in close contact while heat continues to build. The longer the egg stays hot, the more likely the ring is to appear.
Even though the color may look unpleasant, the egg remains safe to eat. The main issue is appearance, along with a stronger sulfur smell that can develop when eggs are overcooked.
Overcooking Is the Main Reason
Overcooking is the most common reason hard-boiled eggs develop a green ring. When eggs are boiled aggressively or left in hot water for too long, the internal temperature continues to rise.
That extra heat gives the iron and sulfur more time to react. As a result, the yolk may lose its bright golden color and develop the familiar dull ring around its edge.
Many people accidentally overcook eggs because they continue boiling them for several minutes after the water reaches a full boil. Others leave cooked eggs sitting in hot water while preparing other food.
Both habits can lead to the same result. The egg may still taste fine, but the yolk can become dry, crumbly, and discolored.
How to Start Cooking Eggs the Right Way
A better method begins before the water boils. Place the eggs in a single layer inside a pot so they cook evenly and do not bump into one another too much.
After arranging the eggs, cover them with cold water. The water should rise about an inch above the eggs to make sure they heat evenly from all sides.
Starting with cold water helps the temperature rise gradually. This gives the eggs a more even cooking environment and reduces the chance of harsh heat affecting the texture.
Once the eggs and water are in the pot, place the pot over medium heat. Let the water come to a gentle boil rather than a rough, rolling boil.
The Best Timing for Hard-Boiled Eggs
Timing is one of the most important parts of preventing the green ring. Once the water reaches a gentle boil, turn off the heat and cover the pot.
Instead of continuing to boil the eggs, allow them to sit in the hot water. This method cooks the eggs with steady residual heat rather than harsh direct boiling.
For slightly softer yolks, let the eggs sit for about 9 minutes. This produces a yolk that is cooked but still softer in the center.
For firm yolks that work well in salads, let the eggs sit for about 12 minutes. This gives the eggs enough time to set completely without pushing them into overcooked territory.
The difference between a well-cooked egg and an overcooked one can be only a few minutes. Using a timer helps keep the process consistent every time.
Why Cooling Eggs Immediately Matters
When the timer ends, the eggs should be cooled right away. Leaving them in hot water allows the cooking process to continue, even after the heat has been turned off.
The simplest way to stop cooking quickly is to transfer the eggs into an ice water bath. The cold water brings down the temperature fast and helps protect the yolk from discoloration.
This immediate cooling step is one of the best ways to prevent the greenish-gray ring. It stops the reaction before it has time to become visible around the yolk.
Cooling also makes the eggs easier to handle. Once they have chilled, they are less likely to feel too hot to peel or slice.
Ice Water Also Helps With Peeling
An ice water bath does more than stop the cooking process. It can also make the shells easier to remove.
As the eggs cool, the inside can separate slightly from the shell. This makes peeling less frustrating, especially when preparing several eggs at once.
After the eggs have cooled, gently tap each one on a hard surface. Cracking the shell all around the egg helps loosen it before peeling.
Peeling under running water can also help. The water can slip between the shell and the egg, making it easier to remove small pieces without tearing the white.
Older Eggs Can Be Easier to Peel
The age of the egg can also affect how easily it peels. Very fresh eggs tend to cling more tightly to their shells.
Eggs that are about a week old are often easier to peel after boiling. They separate more smoothly from the shell, which helps keep the cooked egg white intact.
This does not mean fresh eggs cannot be boiled successfully. It simply means slightly older eggs may be more convenient when appearance matters.
For dishes where the eggs will be sliced, halved, or served whole, easier peeling can make a noticeable difference. Smooth whites give the finished plate a cleaner look.
Simple Steps Make a Big Difference
Perfect hard-boiled eggs do not require complicated techniques. The most important details are gentle heating, correct timing, and fast cooling.
Starting eggs in cold water helps them warm evenly. Turning off the heat after a gentle boil prevents excessive cooking.
Letting the eggs sit for the right number of minutes gives the yolks enough time to set. Moving them immediately into ice water stops the process before discoloration begins.
These small adjustments can improve both the appearance and texture of the eggs. Instead of dry yolks with a greenish edge, the result is a more attractive golden center.
How to Get Golden Yolks Every Time
The key to avoiding the green ring is control. Eggs should not be left to boil without a timer, and they should not remain in hot water after they are done.
For softer yolks, 9 minutes of resting in covered hot water is usually enough. For fully firm yolks, 12 minutes is a better target.
After that, the ice bath is essential. Skipping this step can allow the eggs to keep cooking inside their shells, even after they have been removed from the stove.
With the right method, hard-boiled eggs can have tender whites and bright yolks. The process is simple, repeatable, and easy to use for everyday meals.
The Bottom Line on Green Egg Yolks
A greenish-gray ring around a boiled egg yolk may look unappetizing, but it is not dangerous. It is simply the result of iron in the yolk reacting with sulfur in the white during overcooking.
The egg is still safe to eat, though the smell and texture may not be ideal. Preventing the ring mostly comes down to avoiding excessive heat and cooling the eggs quickly.
By placing eggs in cold water, bringing them to a gentle boil, turning off the heat, timing them carefully, and transferring them to ice water, the problem can be avoided.
With a few simple habits, hard-boiled eggs can come out consistently smooth, tender, and golden. The secret is not complicated: cook them carefully, cool them immediately, and do not let them sit too long in heat.