
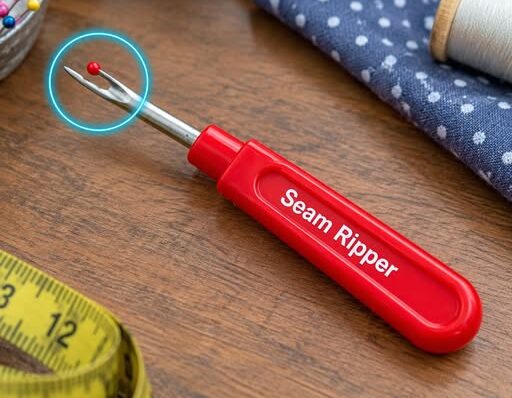
That Tiny Red Ball on a Seam Ripper Has an Important Purpose — and Using It Correctly Can Help Protect Your Fabric
The Rounded Bead Is Designed to Glide Against the Cloth While the Hidden Blade Cuts Thread, Making Seam Removal Safer and More Controlled
A seam ripper is one of the simplest tools in a sewing box.
It is small, inexpensive, and often overlooked until something goes wrong.
But when a seam needs to be removed, the way the tool is used can make the difference between a clean correction and a damaged piece of fabric.
One of the most misunderstood parts of the tool is the tiny red ball found on one of its prongs.
It may look decorative.
It is not.
The Red Bead Covers the Shorter Prong
A typical seam ripper has two prongs at the end.
One is longer and pointed.
The other is shorter and often covered by a small red bead.
Between those two prongs is a curved cutting blade.
That blade is what actually slices through the thread.
The red bead helps the shorter prong move along the fabric more smoothly.
The Bead Helps Reduce Snagging
When the seam ripper is used in the right direction, the rounded bead can rest against the cloth while the blade moves beneath the stitches.
This gives the shorter side of the tool a smoother surface to glide along the fabric.
Without that rounded protection, the prong could be more likely to catch on fibers.
The bead does not make the seam ripper completely safe, but it can help reduce unnecessary snagging when the tool is handled carefully.
The Pointed Tip Is Useful for Individual Stitches
For short seams or delicate materials, the pointed prong is often the better choice.
Slip the pointed tip gently beneath one stitch at a time.
Move slowly.
Cut the thread rather than pulling at the fabric.
As the stitches are released, remove the loose pieces of thread before continuing.
This controlled method can be especially useful when the material is fragile or when only a small section needs to be corrected.
Delicate Fabric Requires Patience
When working with fine material, forcing the tool can quickly create problems.
A seam ripper is sharp.
If the pointed end catches the cloth instead of the thread, the fabric can be snagged or pierced.
That is why it helps to work one stitch at a time when the material needs extra care.
Good lighting also makes it easier to distinguish the thread from the surrounding fibers.
Sturdier Fabric Allows a Different Technique
On stronger materials, the rounded prong can sometimes be used more actively.
Carefully open enough of the seam to place the shorter rounded prong beneath the stitches.
Keep the red bead against the cloth.
Then guide the tool forward slowly so the curved blade between the prongs cuts through the thread.
This can make removing longer sections of stitching faster than cutting every stitch individually.
The Direction of the Tool Matters
The seam ripper should not simply be pushed blindly through a seam.
The position of the prongs affects how the blade interacts with the thread and fabric.
Keeping the rounded bead toward the cloth helps reduce the chance that the shorter prong will dig into the material.
The tool should move with the seam rather than against the resistance of the fabric.
Do Not Force the Blade
One of the easiest ways to damage fabric is to keep pushing when the seam ripper stops moving smoothly.
If you feel resistance, stop.
Do not assume more pressure will solve the problem.
The tool may be caught on fabric rather than thread.
Reposition it and check exactly what the blade is touching before continuing.
Support the Fabric While You Work
Keeping the material stable can make seam removal much easier.
Hold the fabric so the stitches are visible and the seam is not bunching beneath the tool.
This gives you more control over where the blade goes.
It also makes it easier to stop before accidentally cutting into the cloth.
Good Lighting Can Prevent Small Mistakes
Sewing repairs often involve very small threads that can be difficult to distinguish from the fabric itself.
Working in poor light makes it easier to place the seam ripper in the wrong position.
A bright workspace allows you to see the individual stitches more clearly.
That is especially important when working with dark thread, textured fabric, or closely spaced seams.
A Dull Seam Ripper Can Create More Trouble
Like any cutting tool, a seam ripper becomes less effective as the blade wears down.
A dull blade may require more pressure.
That extra force can make the tool harder to control.
If a seam ripper no longer cuts thread cleanly, replacing it may be safer than trying to force it through the stitches.
Loose Threads Should Be Removed as You Go
After a few stitches are cut, small pieces of thread may remain trapped in the seam.
Removing them as you work can help keep the area clear.
It also makes it easier to see which stitches are still holding the fabric together.
This simple habit can prevent accidentally cutting the same area repeatedly.
The Tool Is Useful for More Than Fixing Mistakes
A seam ripper is often associated with correcting sewing errors, but it can be useful for several other tasks.
It can remove basting stitches once they are no longer needed.
It can also help detach sewn-in labels when done carefully.
Any time thread needs to be removed without damaging the surrounding fabric, a seam ripper can be useful.
Basting Stitches Are Often Easy to Remove
Basting stitches are temporary by design.
They are commonly used to hold pieces in position before permanent stitching is completed.
Once the final sewing is finished, a seam ripper can help remove those temporary threads cleanly.
The same careful approach still applies.
Cut the thread rather than pulling forcefully against the fabric.
Sewn-In Labels Can Also Be Removed Carefully
Some labels are attached with a simple line of stitching.
A seam ripper can help release those threads without cutting the garment itself.
The pointed tip can be useful for lifting the first few stitches.
Once part of the seam is open, the remaining thread can often be removed more easily.
Again, patience matters more than speed.
The Small Red Ball Is a Protective Detail
Its job is simple.
It helps the shorter prong slide against the fabric instead of catching it as easily.
That makes the tool easier to control when removing longer runs of stitches from stronger materials.
It is one of those small design choices that can go unnoticed until someone understands what it is meant to do.
It Does Not Make the Tool Damage-Proof
The rounded bead can reduce snagging, but it cannot protect the fabric from every mistake.
The cutting blade is still sharp.
The pointed prong can still pierce material.
Too much pressure can still cause damage.
The safest results come from combining the tool’s design with careful handling.
Stop When Something Feels Wrong
A seam should not require aggressive force to open.
If the tool suddenly sticks, the best response is to stop and inspect the area.
You may be approaching the stitch from the wrong angle.
The blade may be pressing against the fabric instead of the thread.
A few seconds of checking can prevent a tear that takes much longer to repair.
Cap the Seam Ripper Before Storing It
The sharp tip and blade can damage other items in a sewing box if left exposed.
They can also cause accidental cuts when someone reaches into a drawer or container.
Replacing the cap after each use is a simple safety habit.
It also helps protect the tool itself.
Seam Removal Is Easier When You Work Slowly
A sewing mistake can feel frustrating, especially after hours of work.
That frustration can make it tempting to rush.
But aggressive pulling can turn a removable seam into damaged fabric.
Slow work is usually faster than repairing a tear later.
The Best Technique Depends on the Material
There is no single method that works equally well for every fabric.
For delicate material, lifting and cutting individual stitches with the pointed tip gives more control.
For sturdier material, guiding the rounded prong beneath the seam can be faster.
The important part is matching the technique to the fabric rather than forcing the fabric to tolerate the tool.
One Careless Pull Can Undo Hours of Work
Anyone who sews knows how frustrating it can be to discover that a seam needs to be removed.
The instinct may be to finish the correction as quickly as possible.
But thread is usually easier to replace than fabric.
Protecting the material should always come first.
The Seam Ripper Is Designed to Give You Another Chance
Despite its association with mistakes, the tool has a positive purpose.
It allows stitching to be undone without abandoning the entire project.
A crooked seam can be removed.
A misplaced label can be detached.
Temporary stitches can be taken out.
A piece that seemed ruined can often be repaired.
That Tiny Bead Can Make a Big Difference
The red ball on a seam ripper may be one of the smallest details in a sewing kit.
But it has a practical job.
It covers the shorter prong and helps it glide against the fabric while the curved blade cuts thread.
Used correctly, that design can make seam removal smoother and reduce the risk of snagging.
Used carelessly, even the best seam ripper can still damage the material.
The safest approach is simple: support the fabric, work in good light, use the pointed tip for delicate stitches, keep the rounded bead against sturdier fabric when guiding beneath a seam, and stop whenever you feel resistance.
That small amount of patience can protect hours of sewing and give a frustrating mistake another chance to become a successful project.