
A Simple and Efficient Way to Plant Flower Bulbs Using Cardboard Egg Cartons
Creating Order in Large-Scale Bulb Planting
Planting flower bulbs in neat, evenly spaced rows may appear straightforward at first glance. In practice, however, achieving consistent spacing and uniform depth across a large area can be surprisingly demanding.
When working with dozens or even hundreds of bulbs, small inconsistencies quickly add up. Measuring distances repeatedly, adjusting depth, and repositioning bulbs that tip over can turn an enjoyable garden task into a time-consuming project.
An unexpectedly practical solution can be found in an everyday household item: the cardboard egg carton. By repurposing this common material, gardeners can create a structured planting system that promotes precision, efficiency, and healthier root growth.
This approach is valued by gardeners who prioritize organization, sustainability, and long-term soil health. It offers a reliable way to achieve professional-looking results without specialized tools.
Understanding the Egg Carton Trench Technique
The method combines two essential principles of successful bulb planting: maintaining consistent depth and ensuring even spacing.
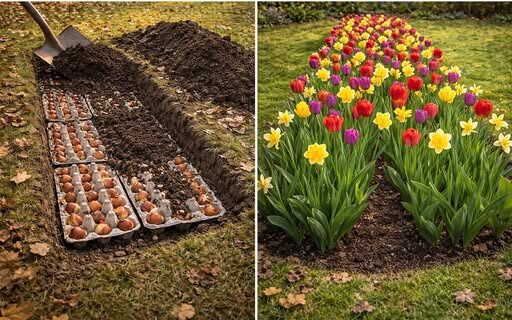
Instead of digging individual holes for each bulb, a continuous trench is prepared at the appropriate depth. Cardboard egg cartons are then placed along the bottom of this trench.
Each cup within the carton serves as a natural guide, holding a single bulb in place. This prevents bulbs from rolling, shifting, or settling unevenly during backfilling.
Because the cartons are made of biodegradable paper material, they gradually soften and decompose in the soil. As they break down, they add a modest amount of organic matter without restricting root development.
The result is a low-cost planting system that supports structure and uniformity while remaining environmentally responsible.
Step-by-Step Planting Instructions
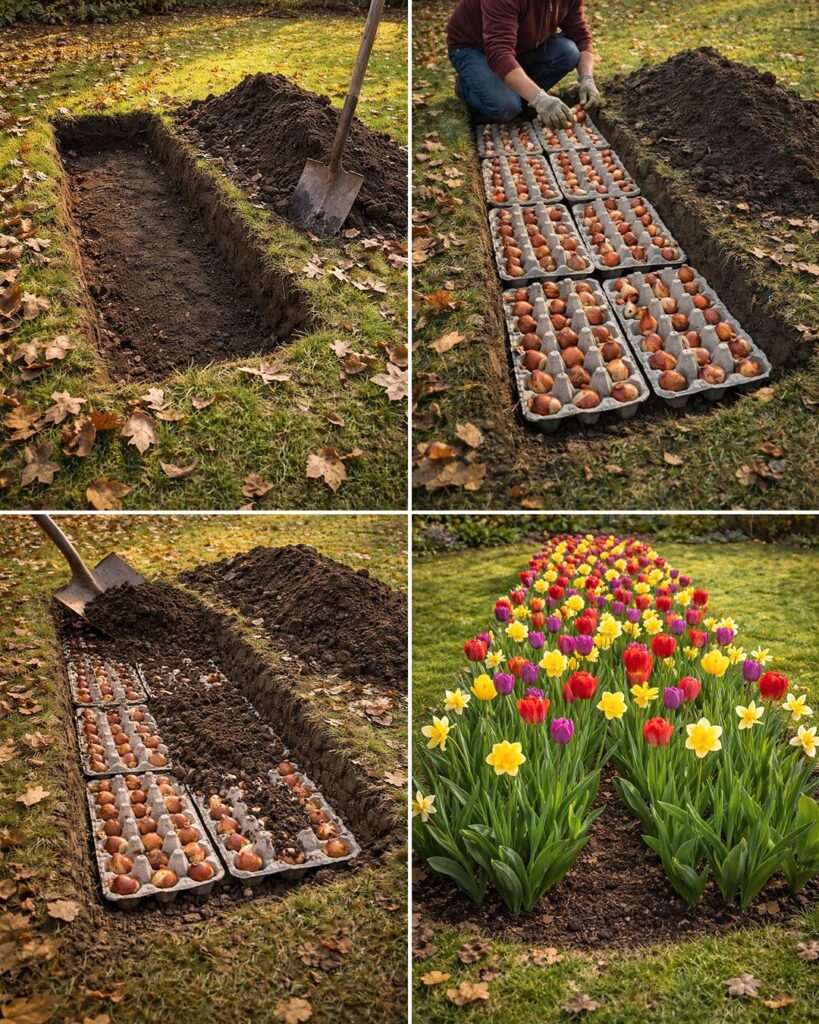
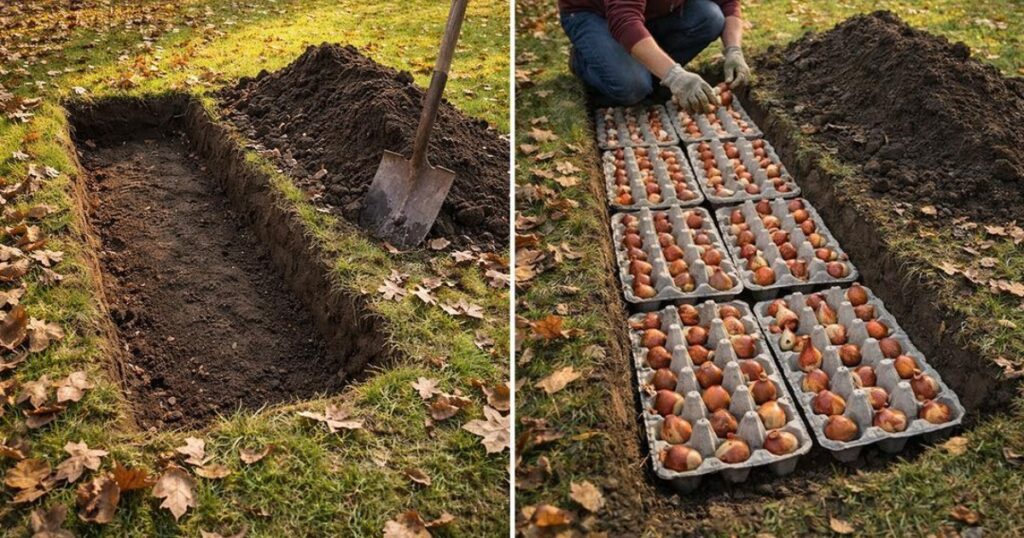
Begin by selecting the appropriate planting location and preparing the soil surface. Remove debris, weeds, and large stones to create a clean working area.
Dig a straight trench to the depth required for the specific type of bulb being planted. Maintaining consistent depth at this stage is essential for uniform growth later.
Lay empty cardboard egg cartons along the base of the trench. Arrange them side by side to create a continuous planting row.
Place one bulb in each cup of the carton. Ensure that the pointed end of each bulb faces upward, as this is where the stem will emerge.
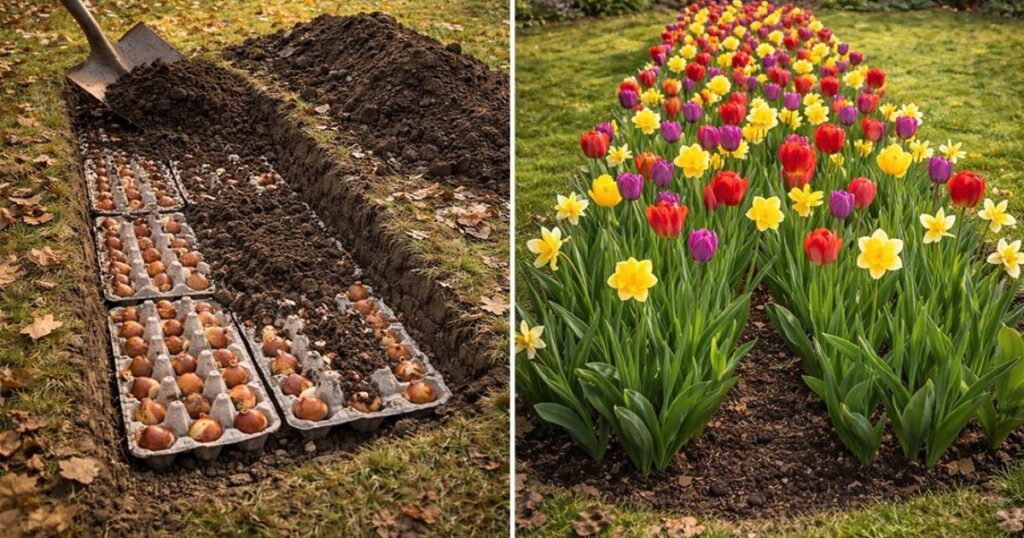
Once all bulbs are positioned, carefully backfill the trench with soil. Cover the cartons and bulbs completely, smoothing the surface as you go.
Water the area thoroughly after planting. This helps settle the soil around the bulbs and eliminates air pockets that could interfere with root establishment.
When growth begins, the evenly spaced bulbs emerge in a balanced and orderly pattern, producing a clean and coordinated display.
Advantages of Using Egg Cartons for Bulb Planting
One of the most significant benefits of this technique is precise spacing without the need for repeated measuring. The natural divisions within the carton ensure consistent distance between bulbs.
Uniform planting depth also contributes to synchronized emergence. When bulbs are placed at the same level, they tend to sprout and bloom around the same time.
This approach reduces planting time considerably, especially when covering larger garden beds. Instead of digging individual holes, multiple bulbs can be positioned simultaneously.
Reusing cardboard cartons provides an environmentally friendly alternative to discarding them. The material breaks down naturally and does not introduce synthetic waste into the soil.
Because each bulb rests securely in its own cup, the risk of tipping or shifting during planting is minimized. This helps protect delicate root structures as they develop.
The visual organization of garden beds is another advantage. Evenly spaced blooms create a structured appearance that enhances overall landscape design.
Bulbs That Work Best With This Method
The egg carton trench technique is particularly effective for small to medium-sized bulbs that do not require excessive spacing.
Many popular spring-flowering varieties respond well to this approach. Tulips, daffodils, crocus, and hyacinths are commonly planted using this method.
Grape hyacinths, snowdrops, and scilla also adapt easily to the consistent spacing provided by carton cups. Anemone blanda and iris reticulata are additional suitable choices.
Summer-blooming bulbs such as gladiolus, freesia, ranunculus, ixias, and dwarf lilies can also benefit from this organized planting system.
Very large bulbs, including oversized ornamental varieties, typically require deeper placement and wider spacing. These are better planted individually to allow sufficient room for development.
Selecting Appropriate Egg Cartons
Not all egg cartons are suitable for soil use. Plain cardboard or recycled paper cartons are ideal because they decompose naturally over time.
Uncoated and non-plastic materials ensure that roots can grow freely without obstruction.
Styrofoam, plastic, or wax-coated cartons should not be used. These materials do not break down in the soil and may interfere with drainage or root expansion.
For improved drainage in heavier soils, small holes can be gently poked into the bottom of each cup before placing the cartons into the trench.
Determining the Proper Planting Depth
Correct planting depth is essential for strong growth and reliable blooming. A widely accepted guideline is to plant bulbs at a depth equal to two to three times their height.
For example, tulips and daffodils typically require a depth of approximately 12 to 15 centimeters. Hyacinths perform well when planted 10 to 12 centimeters deep.
Smaller bulbs such as crocus and muscari generally need a shallower depth of around 6 to 8 centimeters.
Preparing the trench accurately before placing the cartons ensures that all bulbs rest at the correct level.
Supporting Healthy Growth After Planting
Successful blooming begins with selecting high-quality bulbs. Healthy bulbs should feel firm, dry, and free from visible mold or damage.
Weak or compromised bulbs are unlikely to produce strong flowers, regardless of planting method.
Timing is also critical. Spring-flowering bulbs should be planted in autumn, allowing them to establish roots before winter.
Summer-flowering varieties are best planted in spring, once the risk of frost has passed.
Cold-season bulbs require a period of winter chilling to trigger proper bloom development.
Improving soil structure enhances overall performance. Incorporating compost, leaf mold, or well-rotted manure helps create a nutrient-rich environment.
Good drainage is particularly important, as bulbs are highly vulnerable to rot in waterlogged conditions.
After planting, water deeply once to activate root growth. Frequent watering during winter is generally unnecessary unless the soil becomes extremely dry.
A light layer of mulch, such as straw, dry leaves, or wood chips, can help regulate soil temperature and reduce erosion.
Fertilizer should be applied with moderation. A light application of bulb fertilizer or compost at planting time or in early spring is usually sufficient.
Excess nitrogen encourages leafy growth but may reduce flower production.
Once flowering has finished, allow the foliage to die back naturally. Green leaves store energy for the following year’s blooms.
Removing foliage too early can weaken the bulb and diminish future flowering performance.
Common Errors to Avoid
Planting bulbs too shallow can expose them to temperature fluctuations and reduce stability.
Using plastic or coated cartons prevents natural decomposition and may hinder root growth.
Overwatering during colder months increases the risk of rot and fungal issues.
Damaged or diseased bulbs should never be planted, as they can fail to bloom or spread problems in the soil.
Ignoring drainage concerns in heavy clay soils can undermine even the most carefully planned planting layout.
A Practical and Sustainable Gardening Strategy
The egg carton trench method demonstrates how simple ideas can produce reliable and polished results. It combines efficiency with environmental awareness.
By reducing the need for constant measuring and repositioning, the technique saves time while improving accuracy.
The biodegradable nature of cardboard supports soil health rather than contributing waste.
When paired with healthy bulbs, proper planting depth, and well-prepared soil, this approach encourages dense and vibrant blooms.
Garden beds planted using this system often display consistent spacing and synchronized flowering, enhancing visual impact.
Over time, bulbs established in optimal conditions can return year after year, creating dependable seasonal color.
This method offers a practical advantage for gardeners seeking structure, sustainability, and long-term performance without complicated tools or expensive materials.
By turning an ordinary household item into a functional planting aid, gardeners can streamline their work while supporting healthy growth beneath the surface.
Careful preparation, thoughtful material selection, and attention to seasonal timing ensure that this straightforward technique delivers lasting results.
In many cases, effective gardening does not require elaborate systems. Sometimes, the simplest solutions provide the strongest foundation for beautiful and enduring blooms.