
The Gentle Art of Unpicking: How to Use a Seam Ripper Without Damaging Fabric
Why Removing Stitches Is an Essential Sewing Skill
Every sewing project includes moments when stitches need to be removed. A seam may turn out uneven, a hem may sit at the wrong height, or two pieces of fabric may have been joined in the wrong direction.
These mistakes do not necessarily mean that the project has been ruined. With the right tool and a careful technique, stitches can often be removed cleanly so the fabric can be sewn again.
A seam ripper is designed specifically for this task. It allows a sewer to cut thread without using large scissors or pulling forcefully against the material.
Learning how to use one properly is just as valuable as learning how to guide fabric through a sewing machine. Correct unpicking protects the material, preserves the shape of the garment, and makes it possible to repair mistakes without creating additional damage.
Understanding the Basic Design of a Seam Ripper
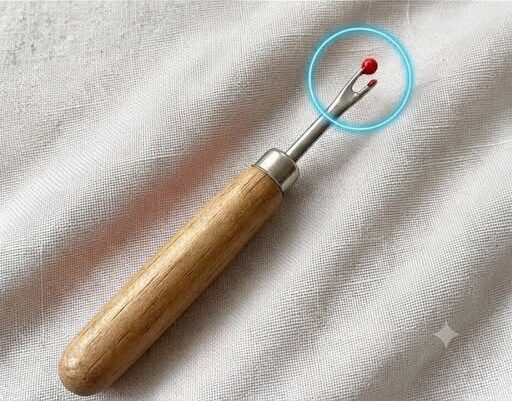
A seam ripper is a small handheld sewing tool with a narrow metal head. The head normally includes a sharp pointed tip, a rounded tip, and a small curved blade positioned between them.
The pointed end is used to slide carefully beneath a stitch. The curved blade then cuts the thread while helping keep the sharp edge away from most of the surrounding fabric.
The rounded tip provides additional protection and can help guide the tool along a seam. This design makes a seam ripper safer and more precise than ordinary scissors when working with closely placed stitches.
Many seam rippers also include a handle that offers a steady grip. A comfortable handle is especially useful when removing a long seam or working with small stitches that require close attention.
Although the tool looks simple, its shape has been carefully designed for accuracy. Each part helps the user separate thread from fabric with less risk of snagging, stretching, or cutting the material.
Why Scissors Are Not Always the Best Choice
Small scissors can sometimes remove loose threads, but they are not ideal for opening a complete seam. Their blades are wider than the space beneath most stitches, making it easy to catch the fabric accidentally.
Scissors may also require the user to lift the seam away from the material before cutting. Pulling too firmly can stretch delicate fabric or create visible holes around the stitch line.
A seam ripper works differently. Its narrow point can be placed directly beneath an individual stitch without lifting a large section of fabric.
The user can then cut only the thread that needs to be removed. This controlled approach reduces unnecessary pressure and helps preserve the original condition of the material.
Using the correct tool does not eliminate every risk, but it makes careful stitch removal much easier. Slow movement and good lighting remain important no matter which fabric is being handled.
Preparing the Fabric Before Unpicking
Before beginning, place the garment or sewing project on a clean, flat surface. Good support prevents the fabric from twisting while the seam ripper is in use.
Make sure the area is well lit so the stitches can be clearly distinguished from the material. This is especially important when the thread color closely matches the fabric.
Identify the exact section that needs to be opened. Removing more stitches than necessary creates additional work and may weaken parts of the seam that were sewn correctly.
Gently spread the fabric on both sides of the seam so the thread becomes easier to see. The material should remain relaxed rather than being pulled tightly.
If the seam includes several layers, determine which thread is joining them. This helps prevent the seam ripper from being pushed between the wrong sections of fabric.
How to Remove the First Few Stitches
Begin at one end of the section that needs correction. Insert the pointed tip of the seam ripper beneath a single stitch, keeping the metal point as close to the thread as possible.
Lift the stitch slightly without pulling hard on the fabric. Move the thread toward the curved blade until it is cut.
Repeat this process for a few nearby stitches. Cutting several threads in a controlled area makes it easier to separate the fabric layers gradually.
Avoid pushing the point deeply into the seam. The sharp tip should pass beneath the thread rather than through the fabric.
After a few stitches have been cut, gently open the seam with your fingers. Loose thread pieces may begin to pull away without resistance.
If the seam does not open easily, stop and cut another stitch. Forcing the fabric apart can create stretched holes or break fibers around the needle line.
Working a Few Stitches at a Time
Patience is one of the most important parts of safe unpicking. Trying to remove an entire seam in one quick movement increases the likelihood of damaging the fabric.
Working in small sections gives better control. It also makes it easier to notice whether the pointed tip is entering the material instead of passing beneath the thread.
For tightly sewn seams, cut every second or third stitch along one side. Turn the fabric over and gently pull the longer thread from the opposite side.
If the thread does not release smoothly, continue cutting additional stitches rather than applying more force.
Loose stitches may come away quickly, while short or reinforced stitches may require more time. The method should be adjusted to the seam rather than rushed for speed.
Careful unpicking may take longer, but it usually prevents the much larger problem of repairing a cut or torn section of fabric.
Protecting Delicate and Lightweight Materials
Thin fabrics require especially gentle handling because the seam ripper’s point can easily pass through them. Lightweight material may also show needle holes more clearly after stitches are removed.
Keep the fabric flat and supported while working. Avoid holding it in the air, where movement can make it harder to control the blade.
Use the smallest possible lifting motion when placing the seam ripper beneath the thread. The goal is to separate the stitch without pulling the surrounding fibers.
Delicate fabrics should be checked after every few cuts. If the material begins stretching or bunching, smooth it before continuing.
Removing thread from the side where the stitches are easiest to see can also reduce risk. A clear view helps keep the blade away from the fabric.
When the seam has been opened, allow the material to rest before sewing it again. This gives any temporary stretching around the stitch line a chance to settle.
Using a Seam Ripper on Thick Fabric
Heavy fabrics may appear more durable, but they still require care. Thick seams often contain several layers and may use strong thread that is harder to cut.
Do not force the seam ripper through a tightly packed area. Excess pressure can cause the tool to slip suddenly and cut the material.
Instead, locate an exposed stitch and begin there. Once the first few threads are removed, the remaining seam usually becomes easier to access.
Work slowly around bulky areas such as folded hems, waistbands, cuffs, and reinforced corners. These sections may contain several rows of stitching.
Make sure only the intended seam is being removed. Cutting a nearby row of structural stitching could loosen a part of the garment that does not need repair.
Strong fabric may tolerate more handling than delicate material, but accuracy remains more important than speed.
Removing Stitches from Hems
A seam ripper is particularly useful when adjusting the length of a garment. Hems often need to be opened before trousers, skirts, sleeves, or curtains can be shortened or lengthened.
Start near a side seam or another area where the stitching is easy to reach. Cut a small number of stitches and gently unfold the hem.
Continue along the edge in short sections until the folded fabric has been released. Remove thread fragments as you work so they do not become tangled in the remaining stitches.
After the hem is fully opened, smooth the fabric and inspect the original fold line. The material can then be measured and prepared for a new hem.
Careful removal is especially important when lengthening an item. Preserving the fabric inside the original hem provides more usable material for the adjustment.
Opening Seams for Garment Alterations
Many clothing alterations require part of a garment to be opened before the fit can be changed. Side seams, waistbands, sleeves, and linings may all need controlled stitch removal.
Mark the section that needs adjustment before beginning. This helps avoid opening a longer area than the alteration requires.
Remove the visible straight stitches first. If the seam has finished edges, additional thread may need to be removed carefully from the inside.
Keep different fabric layers separated whenever possible. This reduces the chance of cutting through a lining while opening the outer seam.
Once the seam has been released, inspect the fabric for loose thread and stretched areas. The garment can then be pinned, fitted, and sewn in its corrected position.
A cleanly opened seam is easier to alter and produces a more professional result when the garment is reconstructed.
Replacing a Zipper with Greater Control
Replacing a zipper often involves removing several lines of stitching. A seam ripper allows these stitches to be opened without cutting the surrounding garment.
Begin by identifying the threads that attach the zipper tape to the fabric. Work along one side in small sections and avoid catching the zipper tape with the blade.
Some zippers are secured with additional stitching near the top or bottom. These reinforced areas may require more careful cutting.
As the seam opens, pull the zipper away gently so the next stitches become visible. Do not tear the zipper from the fabric, even if only a few threads remain.
After the old zipper has been removed, clear away all loose thread before positioning the replacement. A clean opening makes accurate installation easier.
Clearing Away Loose Threads
Once a seam has been opened, small pieces of thread often remain trapped in the fabric. These fragments should be removed before the section is sewn again.
Use your fingers to lift away longer threads. A soft brush can help clear shorter pieces without scratching the material.
Do not scrape aggressively across the fabric with the seam ripper. The blade is intended for cutting stitches, not brushing the surface.
Check both sides of the material because thread fragments may remain hidden beneath folds or between layers.
Removing every loose piece creates a cleaner work area. It also prevents old thread from becoming caught in the new seam.
Inspecting the Fabric After Stitch Removal
After unpicking, examine the area carefully before beginning the correction. Look for pulled fibers, small holes, puckering, or signs that the fabric has stretched.
Many needle holes become less noticeable after the material is gently smoothed. Light handling with clean fingers may help the fibers return to their natural position.
Avoid pulling the fabric in opposite directions to close the holes. Excess stretching can distort the seam line.
The material should lie flat before it is pinned and sewn again. If the fabric remains wrinkled from the original seam, it may need to be carefully prepared before reconstruction.
This inspection step helps prevent the same area from being sewn again while it is still twisted or uneven.
Common Mistakes to Avoid
One common mistake is pushing the seam ripper too quickly along a row of stitches. Although this method may appear faster, the blade can easily leave the thread line and enter the fabric.
Another mistake is pulling the seam apart before enough stitches have been cut. This places unnecessary pressure on the needle holes and may tear delicate fibers.
Using a dull or damaged seam ripper can also create problems. A dull blade may pull at the thread instead of cutting it cleanly.
Working in poor lighting increases the risk of confusing the thread with the fabric. A bright workspace makes precise movements easier.
Finally, removing too many stitches can turn a small correction into a much larger repair. The exact area should be identified before the first thread is cut.
Why Unpicking Is Not a Sign of Failure
Beginners sometimes view stitch removal as evidence that a sewing project has gone wrong. Experienced sewists understand that corrections are a normal part of creating a well-finished item.
Fabric can shift, measurements can change, and seams can appear different after a garment is tried on. Removing and resewing a section is often the best way to improve the final result.
A seam ripper makes that process possible without treating the original work as wasted effort. The stitches can be removed, the fabric can be repositioned, and the project can continue.
Unpicking also helps develop useful sewing habits. It encourages close observation, patience, and attention to construction details.
Each correction offers information about what happened and how the next seam can be sewn more accurately.
Turning Sewing Mistakes into Better Results
A well-used seam ripper can save garments, home projects, and handmade gifts that might otherwise be abandoned after a mistake.
It can help correct uneven hems, crooked seams, misplaced pockets, incorrectly attached sleeves, and many other common sewing problems.
The tool is most effective when used slowly, with the fabric supported and the stitches clearly visible.
Cutting the thread rather than pulling the material protects the structure of the fabric and leaves the area ready for a new seam.
Once the loose threads have been removed and the fabric has been inspected, the correction can be completed with greater confidence.
Learning to unpick carefully changes the way sewing mistakes are viewed. Instead of becoming permanent problems, they become manageable steps in the creative process.
With the right technique and a little patience, a seam ripper allows each project to be refined, corrected, and finished with a cleaner and more professional appearance.