
Can You Find the One Hidden Difference in This Study Scene?
Test your observation skills by comparing two nearly identical pictures of a boy working at his desk
Visual puzzles offer a simple and entertaining way to challenge the brain. They may appear easy at first, but even a small hidden change can be surprisingly difficult to detect.
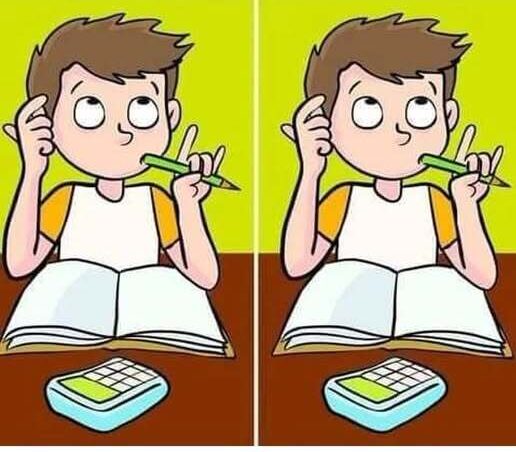
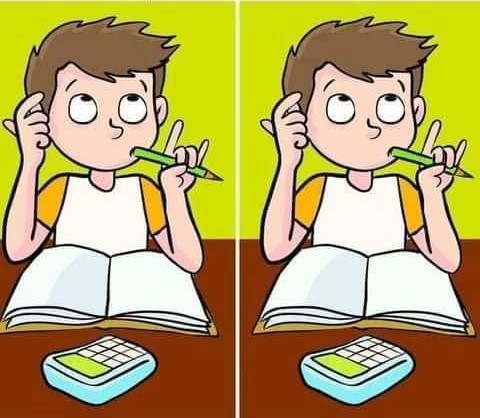
This challenge presents two pictures placed next to each other. At first glance, the illustrations seem completely identical.
Both images show a young boy sitting at a wooden desk while studying. He appears deeply focused as he works through a difficult school subject.
Somewhere between the two pictures, however, one detail has been changed. Your task is to examine the scene carefully and identify the single hidden difference.
Study the Entire Picture Before You Begin
Before focusing on individual objects, take a few seconds to look at the whole scene. Try to remember the position, shape, and color of every visible detail.
The boy is seated in the center of the illustration. He appears to be thinking carefully, possibly trying to remember an important formula for an upcoming examination.
His eyes are directed upward rather than toward the book. This expression suggests that he is searching his memory for an answer.
In one hand, he holds a bright green pencil. The color makes the pencil one of the most noticeable objects in the scene.
A large book or notebook lies open in front of him. Its pale pages stretch across the middle of the desk.
Near the bottom of the image, there is a small blue calculator. It has a green display and several white buttons.
The setting appears calm, organized, and ordinary. That simplicity is exactly what makes the hidden difference difficult to find.
Why the Two Images Look Identical
Spot-the-difference puzzles are designed to take advantage of the way the brain processes familiar scenes. Instead of examining every object individually, the mind quickly forms a general impression.
Once the brain decides that both pictures show the same boy, desk, book, and calculator, it may stop paying attention to smaller details.
The hidden change may involve a color, shape, position, or missing feature. Even when the difference is directly in front of you, your eyes may repeatedly pass over it.
This is why a careful strategy is more effective than staring randomly at the images. Breaking the picture into sections makes it easier to compare matching details.
Begin at the top of the illustration and gradually move downward. Check only one small area at a time before continuing.
Start With the Boy’s Hair and Face
The upper section of the picture contains several details that deserve close attention. Begin by comparing the boy’s brown hair in both images.
Look at the shape of his hairstyle, the direction of each section, and the outline around his head. A tiny change in the hair may be easy to overlook.
Next, examine his eyebrows. Compare their position, thickness, and shape on both sides.
Move down to his eyes. Since he is looking upward, check whether both eyes point in the same direction and have the same expression.
Study his nose and mouth as well. A slight change in the curve of his lips or the shape of his face could be the hidden answer.
Do not rush through this section. Facial features often appear identical because people naturally focus on the complete expression rather than the individual parts.
Try covering one image and memorizing the boy’s face before looking at the second picture. This may help reveal a small alteration.
Compare His Clothing Carefully
After checking the face, move your attention toward the boy’s clothing. He is wearing a white T-shirt with bright orange sleeves.
Compare the neckline in both pictures. Check whether its shape, width, and position remain the same.
Look closely at the orange sleeves. One may contain a change in length, outline, shading, or color.
Examine the white section of the shirt for any missing mark or altered fold. A small line can easily disappear into a simple area of clothing.
The edge of the shirt may also provide a clue. Compare where it meets the boy’s arms and the desk.
Because the shirt uses strong contrasting colors, many people assume they would immediately notice a difference there. That confidence can cause them to examine it less carefully.
Focus on the Boy’s Hands and Pencil
The boy’s hands are another important area of the puzzle. Pay close attention to the number and position of his fingers.
Compare how his hand wraps around the green pencil. Check whether the pencil is held at exactly the same angle in both illustrations.
Look at the pencil’s length, point, and color. A missing tip or a slight color change could be difficult to notice against the surrounding objects.
Study the boy’s other hand as well. It may be resting on the table or positioned close to the open book.
Make sure the shape of each wrist and arm matches. A small line or change in posture may be the only difference between the pictures.
Hands contain many closely placed details, making them especially useful for hiding visual changes. Take your time when comparing this part of the scene.
Inspect the Open Book on the Desk
The large open book occupies a central position in the illustration. Its size makes it one of the first objects most viewers notice.
Examine the shape of both pages. Check whether the page edges curve in the same direction and whether the center fold matches.
Look for lines, shadows, marks, or other small features on the pages. One page may contain something that is absent from the matching image.
Compare the book’s position in relation to the boy’s hands and the edge of the table. Even a slight change in placement may be meaningful.
The pale pages may appear empty when viewed quickly. Slowly scan from one corner to the other instead of treating the entire book as one object.
Repeated patterns and simple surfaces can confuse the eyes. The brain may automatically complete a missing line or ignore a tiny mark because it expects both pages to match.
Do Not Ignore the Wooden Table
The desk itself may appear to be only a background element, but it should still be examined carefully. Compare its edges, surface lines, and visible corners.
Look for any difference in the wood grain or shading. A line may have been shortened, removed, or placed in a different position.
Check where the book and calculator touch the table. The spaces around these objects may reveal a small change in their placement.
Examine the lower edge of the desk and any visible supports. Puzzle creators often hide differences in areas that seem less important than the main subject.
Many participants focus entirely on the boy because he is the largest figure. This can allow a change in the furniture to remain unnoticed.
Take a Close Look at the Calculator
The small calculator near the bottom of the scene contains several separate details. Its blue body, green screen, and white buttons should all be compared carefully.
Begin by checking the calculator’s overall shape. Make sure the corners and outline are identical in both pictures.
Next, compare the green display. Look for a change in its size, color, or position.
Count the white buttons one by one. A missing button can be difficult to detect because the remaining buttons still create a familiar pattern.
Check the spacing between the buttons as well. One may have moved slightly or changed shape.
The calculator is small compared with the other objects, so enlarging the image may make this section easier to inspect.
Do not assume that the smallest item must contain the answer. The purpose of examining it is to eliminate one possible location at a time.
Use a Section-by-Section Method
If the difference is still hidden, divide the picture into an imaginary grid. You can separate it into upper-left, upper-right, lower-left, and lower-right sections.
Compare the same section in both pictures before moving to the next one. This prevents your eyes from jumping randomly across the scene.
You may also scan horizontally. Begin at the top edge and move slowly from left to right, then repeat the process slightly lower.
Another useful approach is to alternate your gaze rapidly between matching objects. Changes sometimes become more noticeable when the eyes switch back and forth.
Try looking away from the screen for a moment before returning. A brief visual reset can help you notice something your brain previously ignored.
Avoid staring at one area for too long. When the eyes become tired, even obvious differences can become harder to recognize.
Can You Find It in Ten Seconds?
Only highly observant viewers may discover the hidden detail immediately. Try setting a timer for ten seconds and see whether you can solve the challenge before it ends.
Begin the countdown only after both pictures are fully visible. Keep your attention focused and avoid looking at anything else on the screen.
If the timer expires before you find the answer, continue searching without becoming discouraged. Speed is only one part of the challenge.
Finding the difference eventually still requires strong concentration and patience. Some visual changes are intentionally designed to remain hidden during a quick glance.
You can repeat the challenge with friends or relatives. Ask each person to inspect the pictures separately and compare how long it takes them to locate the change.
The activity can become a simple competition to determine who has the sharpest visual attention.
Why Visual Puzzles Can Be Enjoyable
Picture puzzles encourage people to slow down and examine details they would normally ignore. They turn ordinary observation into an active challenge.
The process requires concentration, memory, and pattern comparison. The viewer must remember what appears in one image while searching for a mismatch in the other.
These challenges can also provide a brief break from daily routines. They are easy to begin, require no complicated instructions, and can be enjoyed by people of different ages.
Solving the puzzle often produces a satisfying moment when the hidden change suddenly becomes obvious. After discovering it, many people wonder how they failed to notice it earlier.
That reaction is part of the fun. The answer usually remains difficult only until the brain identifies the correct area.
Give the Picture One Final Examination
Before giving up, return to the top of the image and perform one final scan. Compare the boy’s hair, eyebrows, eyes, nose, and mouth.
Move down to his white and orange shirt. Check the sleeves, neckline, arms, hands, and bright green pencil.
Study the open book page by page. Examine the lines, edges, shadows, and central fold.
Then inspect the wooden desk and the small blue calculator. Count every button and compare the green display.
Remember that there is only one hidden difference. Once you find a clear mismatch, you have completed the challenge.
Stay calm, ignore distractions, and allow your eyes to move slowly across the two illustrations.
Your inner detective may be only seconds away from solving the mystery.
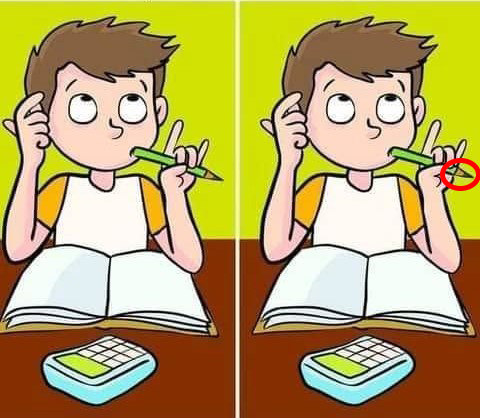
Answer
The exact hidden difference can be confirmed only by directly comparing the two puzzle images. Examine the boy, his clothing, the open book, the pencil, and the calculator carefully to locate the single altered detail.