
How to Can Meatloaf Safely for Long-Term Storage
A Practical Way to Preserve Homemade Meatloaf
Canning meatloaf can be a useful option for anyone who wants to prepare a hearty meal in advance and store it for later use. Instead of relying only on freshly baked meatloaf, this method allows the mixture to be packed into jars and pressure-canned so it can be kept for an extended period when handled properly.
The process requires careful preparation, clean jars, the correct amount of headspace, steady pressure, and enough processing time. Because meatloaf contains ground beef and other ingredients, pressure canning is an important part of the method described here.
This guide explains the ingredients, preparation steps, jar packing method, pressure canning process, seal checking, and storage advice for homemade canned meatloaf.
Ingredients Needed for Canned Meatloaf
To prepare this canned meatloaf, you will need 10 pounds of ground beef. This forms the base of the recipe and gives the final product its rich, savory flavor.
The recipe also uses 3 garlic cloves. The amount should not be increased, because garlic can become stronger after pressure canning and may overpower the flavor of the meatloaf.
You will also need 1/2 onion, 2 to 3 tablespoons of light brown sugar, 1 and 1/4 cups of tomato ketchup, and 1 plastic package of saltine crackers from a box of saltines.
For seasoning, the mixture includes 1 tablespoon of parsley, 1 teaspoon of yellow mustard powder, 1 teaspoon of pepper, and 2 teaspoons of salt.
Finally, 8 eggs are added to help bind the meatloaf mixture together before it is packed into jars.
Preparing the Jars and Lids
Before mixing the meatloaf, prepare the canning jars, lids, and bands. Clean jars are essential because the meat mixture will be packed directly into them before pressure canning.
The lids should be kept in hot water before use. This helps soften the rubber seal so the lids can form a proper seal after processing.
It is also important to inspect the jars before filling them. Any jar with cracks, chips, or damage around the rim should not be used, because it may not seal correctly.
The bands should be clean and ready to apply, but they should not be overtightened once placed on the jars. Finger-tight is enough because air must be able to escape during processing.
Mixing the Meatloaf
Once the jars and lids are prepared, place the ground beef in a large mixing bowl. Because the recipe uses 10 pounds of meat, the bowl should be large enough to allow the ingredients to be combined evenly.
Add the garlic, onion, brown sugar, ketchup, saltine crackers, parsley, mustard powder, pepper, salt, and eggs to the bowl.
The mixture should be blended thoroughly so the seasonings and binders are spread throughout the ground beef. Uneven mixing can leave some jars with too much seasoning and others without enough flavor.
The goal is to create a firm, well-combined meatloaf mixture that can be packed tightly into jars without leaving large air spaces inside.
Packing the Meatloaf Into Jars
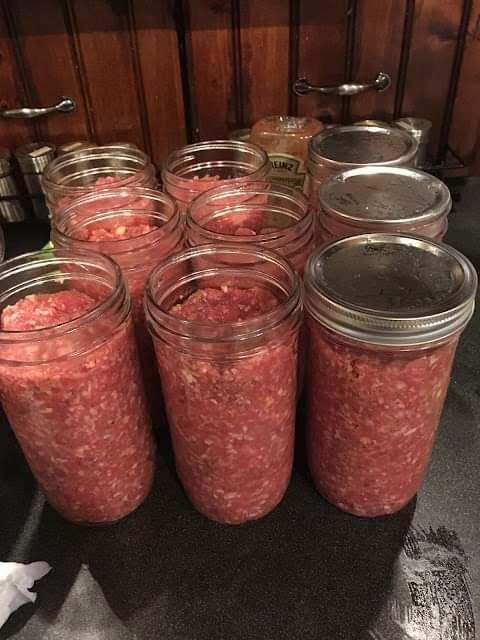
After the mixture is ready, begin packing it into clean canning jars. Add the meatloaf mixture a little at a time rather than filling the jar all at once.
As each portion is added, gently press it down to remove air pockets. This step helps the meatloaf settle firmly inside the jar and creates a more even final texture.
Leave about 1 and 1/4 inches of headspace at the top of each jar. Headspace is the empty area between the food and the lid, and it is necessary for proper processing and sealing.
If the jars are filled too high, food or liquid may interfere with the seal. If too much space is left, the jar may not process as intended.
Cleaning the Jar Rims
Before applying the lids, wipe the rims of the jars carefully. Any grease, meat residue, or seasoning left on the rim can prevent the lid from sealing properly.
Once the rims are clean, place the lids on top of the jars. Then apply the bands and screw them on until they are finger-tight.
The bands should hold the lids in place, but they should not be tightened too firmly. During pressure canning, air needs to escape from the jars while the lids remain positioned correctly.
This balance helps the jars seal as they cool after the canning process is complete.
Starting the Pressure Canning Process
Place the filled jars into the pressure canner with cold water. Starting with cold water helps reduce the risk of shocking the jars.
After the jars are placed inside, turn on the heat and close the canner tightly without adding the weight at first.
Allow steam to escape for about 10 minutes. This step helps create the proper canning environment before pressure is built inside the canner.
Once steam has escaped for the required time, place the weight on the canner’s vent, sometimes referred to as the nipple. This allows pressure to begin increasing inside the canner.
Maintaining the Right Pressure
The pressure should reach 10 psi before the heat is reduced. Once that pressure is reached, adjust the heat carefully so the pressure remains steady.
The jars should be processed at 10 psi for a minimum of 90 minutes. During this time, it is important to monitor the pressure and make sure it does not drop below the required level.
Maintaining steady pressure is one of the most important parts of the process. If the pressure fluctuates too much, the jars may not process evenly.
The full processing time should be completed before turning off the heat. Rushing this stage can affect both the safety and quality of the canned meatloaf.
Cooling the Canner Naturally
When the processing time is finished, turn off the heat and allow the pressure canner to cool naturally. Do not try to speed up the cooling process.
The weight should not be removed immediately. Let the canner sit and release pressure on its own.
After canning, the jars should be allowed to rest before the seals are checked. The instructions recommend waiting at least 24 hours before testing the jars.
This resting period gives the lids time to seal fully as the jars cool.
Checking the Jar Seals
After 24 hours, remove the bands and check the lids. A properly sealed lid should stay firmly attached to the jar.
One way to test the seal is to gently lift the jar by the lid. If the lid stays in place, the seal has formed correctly.
The lid should also appear concave, meaning it curves slightly inward. This is another sign that the jar has sealed.
If a lid pops up or does not stay attached, the jar did not seal properly. That jar should not be stored with the sealed jars.
How to Serve Canned Meatloaf
When it is time to eat the canned meatloaf, the contents may not slide out of the jar easily at first. The juice inside the jar can solidify during storage.
To loosen the meatloaf, the jar can be warmed slightly. This may be done by using a microwave or placing the jar in hot water, depending on the method being used.
Gentle reheating helps soften the solidified juices and makes it easier to remove the meatloaf from the jar.
Once removed, the meatloaf can be served as a ready-made meal component and enjoyed for its preserved savory flavor.
Storage Tips for Canned Meatloaf
Sealed jars of canned meatloaf should be stored in a dark, cool, and dry room. This helps protect the quality of the food during storage.
The jars should be kept away from excessive heat, moisture, and direct light. A stable storage space helps preserve the canned product more effectively.
If a jar does not seal properly and the lid pops up, it should be refrigerated instead of placed in long-term storage.
An unsealed jar should be consumed within two weeks. The same two-week guideline applies to leftovers after a sealed jar has been opened.
After opening a jar, place the lid back on any remaining meatloaf and store it in the refrigerator. The leftovers should also be used within two weeks.
Why Careful Preparation Matters
Canning meatloaf is not the same as preparing a fresh loaf for the oven. The food is packed into jars, sealed, processed under pressure, cooled, checked, and stored for later use.
Each step affects the final result. Clean jars help protect the food, proper headspace supports sealing, steady pressure supports processing, and careful storage helps maintain quality.
The recipe also uses measured seasoning amounts to keep the flavor balanced after canning. Garlic, in particular, should not be increased because its flavor can become too strong during pressure canning.
By following the process carefully, the meatloaf can be preserved in jars and enjoyed later without needing to prepare a fresh batch from the beginning.
A Convenient Make-Ahead Meal Option
Canned meatloaf offers a practical way to store a homemade comfort food for future meals. With 10 pounds of ground beef and a full mixture of seasonings, the recipe is designed for batch preparation.
The process takes time, especially because the jars must be pressure-canned for at least 90 minutes and then cooled naturally before the seals are checked.
However, once the jars are sealed and stored correctly, the finished meatloaf becomes a convenient option for later meals.
Careful packing, steady pressure, patient cooling, and proper storage all work together to preserve the meatloaf’s flavor and texture.
For anyone who wants a make-ahead meat dish that can be stored in jars, this method provides a structured way to prepare, can, check, and serve homemade meatloaf safely and effectively.